Last but not least, we will create the Services section component after which our Home page will be completed. This section has one dependency that is it allows user to click on each service and that is redirected to Service Details page. The section looks like the screen below:

A carousal with 5 services items. So according to our previous blogs, we will need 2 templates i.e. one is Service item and other is Services Folder (a container template). Also we need to understand that each item created from Service item template will be a page by itself (Service Details page). So now lets understand what all fields are required for Service item template, the list of fields will depend on the section on Home page as well as on the Services Details page:
Service Title
Summary
Thumbnail Image
Main Image (Banner)
Description
File Icon
File Title
File Summary
File Link
So these are all fields we have. Now lets Create 3 sections out of it.
Services Section
– Service Title
– Summary
– Thumbnail Image
Service Details
– Description (We are not taking Main image because it will be created as an image directly)
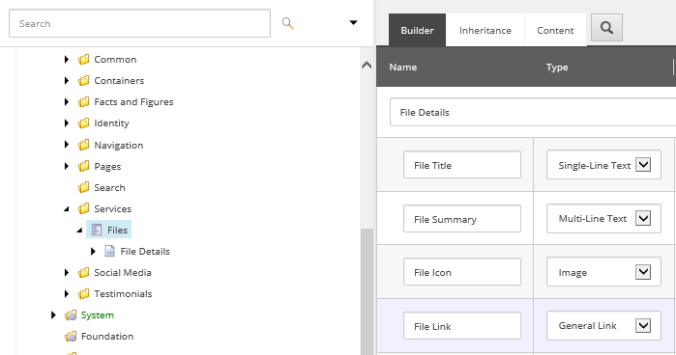
Service File Details
– File Icon
– File Title
– File Summary
– File Link
This is how we will create the template, now file is reusable component i.e. same template can be used anywhere whenever required so we will create separate template for File and inherit it in Service item.
- Lets start designing templates.
- Go to Sitecore >> Content Editor >> Templates >> Sitecore Demo >> Services.
- Right click >> Insert >> New template. Name it as “File”.
- Set an icon to it.
- Create a new template under Services and name it as “Service item”.

- Set an icon to it & add token $name in the Service Title for standard values.
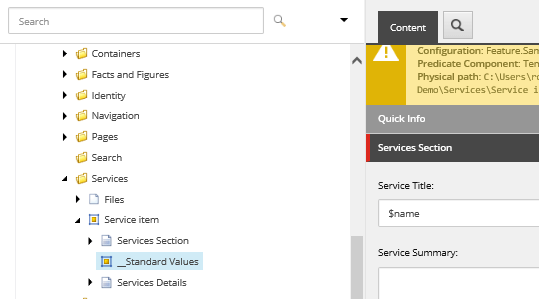
- Since the items created from this template will be pages, we will select the layout in the Standard Values.
- Click on __Standard Values >> Presentation tab >> Details >> Edit. Select the Main Layout and click OK.

- Click OK.
- Click on Service item >> Content tab. Inherit the File template in it.

- Lets create a template under Container (/sitecore/templates/Sitecore Demo/Containers) for Services Folder. Add Icon to it.
- Add insert options as Service item in the Standard Values.

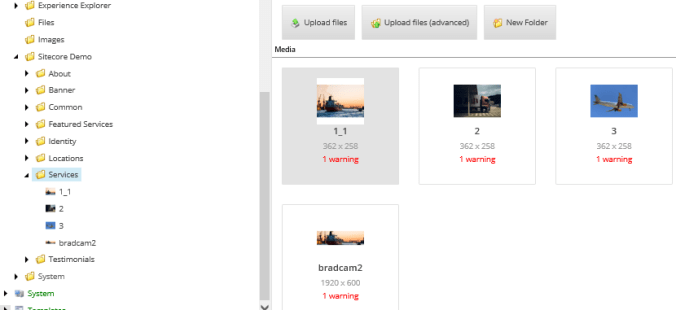
- Lets create a content out of it now. Go to Sitecore Demo folder under Media library and create Services folder.
- Upload all the images related to the Services.
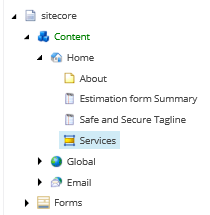
- Go to Home item (/sitecore/content/Home).
- Right Click >> Insert >> Insert from template & select the Services Folder template. Name it as “Services”.
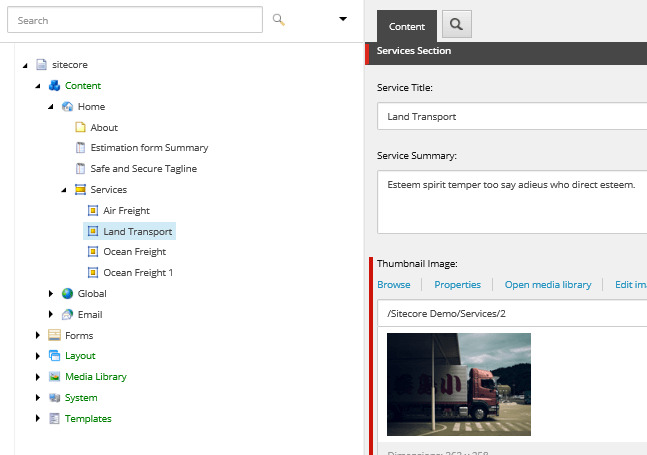
- Now right click on Services and add a Service item and fill in the required details. Only the Services Section.

- Similarly add 3 more services – Land Transport, Air Freight & copy of Ocean Freight.
- Add one item under Dictionary i.e. “Services We Offer”.

- Publish the site.
- Open Visual studio.
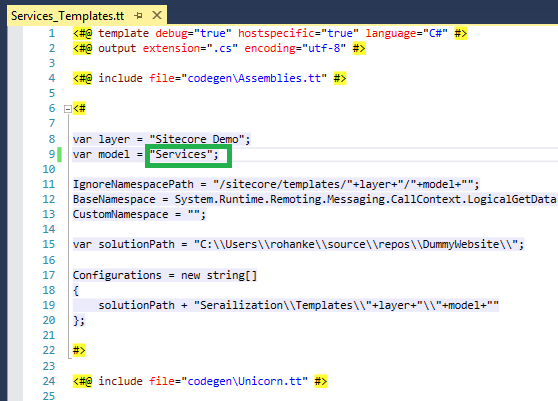
- Copy paste the Common_Templates.tt file and rename it to Services_Templates.tt. Update the modules value to Services and Save the file.
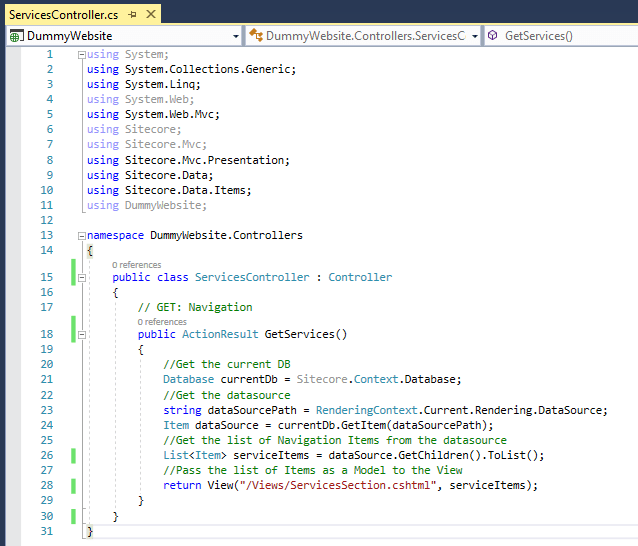
- Create a new Controller, name it ServicesController and write a below code in it.
using System;
using System.Collections.Generic;
using System.Linq;
using System.Web;
using System.Web.Mvc;
using Sitecore;
using Sitecore.Mvc;
using Sitecore.Mvc.Presentation;
using Sitecore.Data;
using Sitecore.Data.Items;
using DummyWebsite;namespace DummyWebsite.Controllers
{
public class ServicesController : Controller
{
// GET: Navigation
public ActionResult GetServices()
{
//Get the current DB
Database currentDb = Sitecore.Context.Database;
//Get the datasource
string dataSourcePath = RenderingContext.Current.Rendering.DataSource;
Item dataSource = currentDb.GetItem(dataSourcePath);
//Get the list of Navigation Items from the datasource
List<Item> serviceItems = dataSource.GetChildren().ToList();
//Pass the list of Items as a Model to the View
return View(“/Views/ServicesSection.cshtml”, serviceItems);
}
}
}
- Add a View with the name “ServicesSection.cshtml” & copy the mark up of the Services section from index.html file.
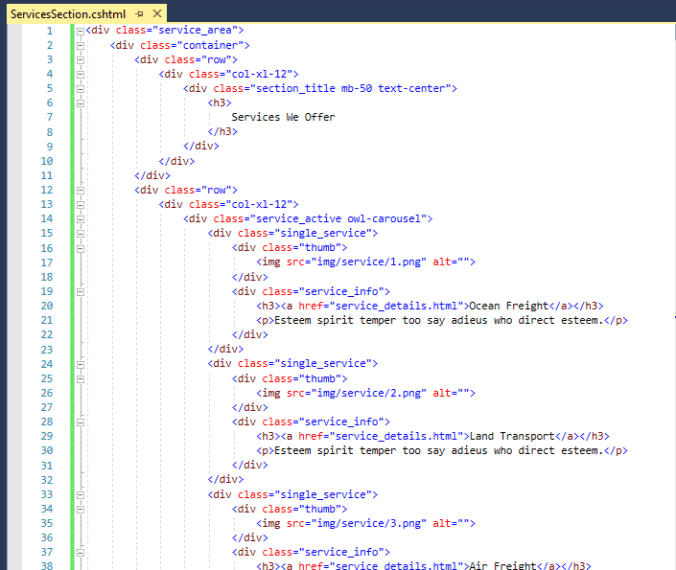
- Replace the code with below one:
@using Sitecore
@using Sitecore.Mvc
@using Sitecore.Data
@using Sitecore.Data.Items
@using DummyWebsite@model List<Item>@if (Model == null || Model.Count <= 0)
{
return;
}<div class=”service_area”>
<div class=”container”>
<div class=”row”>
<div class=”col-xl-12″>
<div class=”section_title mb-50 text-center”>
<h3>
@Sitecore.Globalization.Translate.Text(“Services Section Title”)
</h3>
</div>
</div>
</div>
<div class=”row”>
<div class=”col-xl-12″>
<div class=”service_active owl-carousel”>
@foreach (Item item in Model)
{
var url = Sitecore.Links.LinkManager.GetItemUrl(item);
<div class=”single_service”>
<div class=”thumb”>
@Html.Sitecore().Field(Templates.ServiceItem.Fields.ThumbnailImage_FieldName, item)
</div>
<div class=”service_info”>
<h3>
<a href=”@url”>@Html.Sitecore().Field(Templates.ServiceItem.Fields.ServiceTitle_FieldName, item)</a>
</h3>
<p>@Html.Sitecore().Field(Templates.ServiceItem.Fields.ServiceSummary_FieldName, item)</p>
</div>
</div>
}
</div>
</div>
</div>
</div>
</div>

- Publish the Visual Studio solution.
- Go to Sitecore Demo folder under Rendering item (/sitecore/layout/Renderings/Sitecore Demo).
- Right Click >> Insert >> Controller Rendering. Name it as Services Section.
Insert values for Controller and Controller Action.
Controller: DummyWebsite.Controllers.ServicesController, DummyWebsite
Controller Action: GetServices

- Publish this item and go to Home item (/sitecore/content/Home).
- Presentation tab >> Details >> Edit >> Controls >> Add.

- Select the Services Section rendering & insert “main” as placeholder key. Also check the box.

- Select the Services item under Home as the Data Source.

- Click OK. Move the Services Section rendering to the 3rd location.

- Click OK >> OK. Publish the Home item.
- Browse the Front end site.

With this we have completed the home page & About Page of the Dummy site. In the next blog we will work on Services Details and Listing page.
Thank you.. Keep Learning.. Keep Sitecoring.. 🙂

Pingback: Building Home page Components – “Why Choose Us?” | Sitecore Dairies