In this blog, we will see how to configure SOLR search provider in your instance if you are using Azure Search and now you want to switch to SOLR.
To specify the search provider, open the Web.config file from the Sitecore instance and search for the search:define key. If we want to use SOLR as search provider then it should be as follows:
<add key="search:define" value="Solr" />
To specify the correct connection string to SOLR for the Sitecore instance, open the \Website\App_config\ConnectionStrings.config file and search for the solr.search connection string. It should look like below:
<add name="solr.search" connectionString="https://localhost:8983/solr">
Note: I have used local SOLR URL, you can specify the URL of the Azure hosted SOLR instance.
If you have configured the Azure search earlier and then you need to configure SOLR then change the search provider settings in web.config as mentioned earlier to SOLR and give the SOLR connection string. Also clear the cloud.search settings which contains azure search service URL.
<add name="cloud.search" connectionString="" />
Specify custom names for SOLR cores.
By default, Sitecore looks for predefined index names in SOLR. For example, the predefined name for the master index is sitecore_master_index. If it is not changed, you do not need to do anything.
However, you have named the indexes yourself, you must patch the configuration to reflect this. The value of the <param desc=”name”>$(id)</param> in the \website\App_Config\Sitecore\ContentSearch\ Sitecore.ContentSearch.Solr.Index.Master.config file specifies the custom index name, for example <param desc=”name”>sc10_sitecore_master_index</param> for an index called sc10_sitecore_master_index. This a full list of files where you must specify custom index:
| Index config file | Custom iden name |
| Sitecore.ContentSearch.Solr.Index.Core.config | <Sitecore instance name>_core_index |
| Sitecore.ContentSearch.Solr.Index.Master.config | <Sitecore instance name>_master_index |
| Sitecore.ContentSearch.Solr.Index.Web.config | <Sitecore instance name>_web_index |
| Sitecore.ContentTesting.Solr.IndexConfiguration.config | <Sitecore instance name>_testing_index, Sitecore instance name>_suggested_text_index |
| Sitecore.FXM.Solr.DomainsSearch.Index.Master.config | <Sitecore instance name>_fxm_master_index |
| Sitecore.FXM.Solr.DomainsSearch.Index.Web.config | <Sitecore instance name>_fxm_web_index |
| Sitecore.Marketing.Definitions.MarketingAssets.Repositories .Solr.Index.Master.config | <Sitecore instance name>__marketing_asset_index_master |
| Sitecore.Marketing.Definitions.MarketingAssets.Repositories .Solr.Index.Web.config | <Sitecore instance name>_marketing_asset_index_web |
| Sitecore.Marketing.Solr.Index.Master.config | <Sitecore instance name>_marketingdefinitions_master |
| Sitecore.Marketing.Solr.Index.Web.config | <Sitecore instance name>_marketingdefinitions_web |
| Sitecore.Personalization.Solr.IndexConfiguration.config | <Sitecore instancce name>_personalization_index |
If we are changing the Azure search settings to Solr search then we need to create all these cores in solr and also need to update the configuration files with appropriate solr core name.
Once all cores are created, restart the solr App service (web app) and Sitecore related web app (cm/cd etc.)
Now, login to Sitecore and navigate to control panel and open Populate Solr Managed Schema to populate the solr schema for Solr cores that we created earlier.
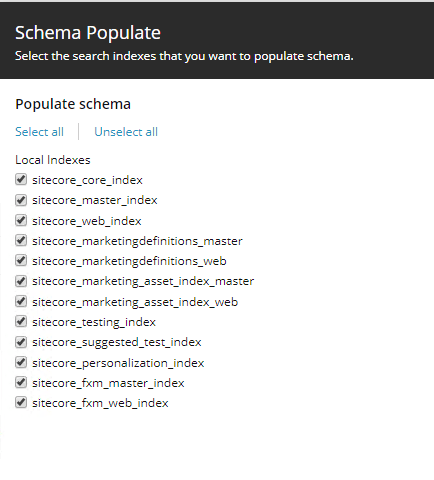
Once these are populated, re-index all the indexes and you are done with Solr configuration.

References that were helpful for me while implementing are mentioned below:
https://doc.sitecore.com/developers/100/platform-administration-and-architecture/en/walkthrough–setting-up-solr.html http://integryx.net/post/2018/05/05/switch-sitecore-9-from-azure-search-to-solr-step-by-step-instructions
Thank you.. Keep Learning.. Keep Sitecoring.. 🙂
