In the previous blog, we saw how to create a package of items and it’s related item using SPE but it was for a single item. Now generally that’s not the case in most of our requirements. So lets explore how to create a package for multiple items along with their related items.
To create a package of multiple items, we have to follow similar steps which we followed in the previous blog. The steps will remain same from step 1 till Step 7.
Now we have some additional steps to do once the pop up disappear. Lets consider you followed the steps in previous blog for item – ‘New Test Template’ in my case.

Lets consider we want to add Item ‘Images with Optimization’ as another item to be added to the same package.
Additional steps after Step 7 from previous blog are as below:
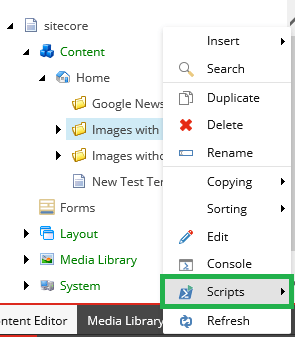
- Right click on ‘Images with Optimization’ >> Scripts.
- Click Scripts >> Packaging >> Add Tree to Package.

- Set the Installation Options to “Ask User” and select the options according to your requirement in “Include Linked Items” field.

- Click OK. And wait for the process to complete.
- The pop up will disappear once the process is complete.
- Right click on any item >> Scripts >> Packaging >> Download the package.
- Fill in the details like Author, Publisher, Version, etc.

- Click OK. And you will get a pop up to download the package.

- Click Download.
Following this blog you have successfully packaged multiple items and their linked items using Sitecore PowerShell Extension (SPE).
Thank you.. Happy Learning.. Happy Sitecoring.. 🙂

Pingback: Creating Sitecore package using Sitecore PowerShell Extension (SPE) | Sitecore Diaries